Your cart is currently empty!
Stenciled Stitched Primitive Pumpkin
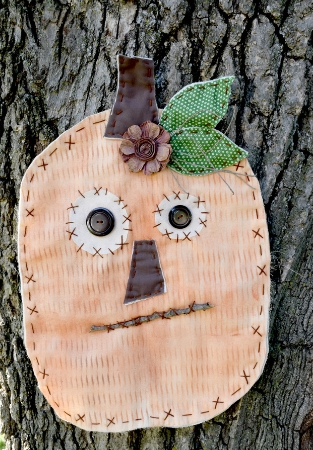
It’s PUMPKIN time! We have just the project you have been looking for! I have made a Stenciled Stitched Primitive Pumpkin to welcome friends and family into your home! This guy is so fun to create and super cute no matter where you hang him!

Although you can’t drink this pumpkin spice, I would say this Stenciled Stitched Primitive Pumpkin has a-latte spice!
Let’s get started!
Step 1:
Wash and dry all fabrics.

Step 2:
Lay out muslin, Warm and Natural, and one more piece of muslin on top of Warm and Natural. That is your sandwich. Using the end of pencil outline a oval shape (shape of pumpkin, your choice). Cut out.


Step 3:
Cut out a brown stem and green leaves, using the same sandwich method as above. Set aside. You can free hand or make a pattern by drawing out on paper first. I free hand mine.

Step 4:
Using narrow masking tape, tape down the center to start stencil with a straight line. Using a blending tool to apply the ink through the stencil. When one half was done, remove tape and rotate to other side using the same line. My blending tool was dirty with brown ink, so when blended with Tangelo it gave a burnt orange appearance. Once stenciled, I went back over it with the blending tool.


Step 5:
Heat set ink with iron.

Step 6:
Time to stitch! You can be super creative or just straight stitch all the way around the pumpkin. I did a straight stitch and a cross stitch mix. Stitch around leaves and stem also. Attach leaves and stem to pumpkin with straight stitch. You could stop here if you like. But I took it one step further!


Step 7:
Using muslin, cut out two circles. Circles must be bigger then buttons. Using brown fabric and Warm and Natural, cut a nose. Stitch muslin circles onto front of pumpkin, where you want your eyes to be. Stitch buttons on top of muslin circles. Stitch nose on. Using a stick from outside I stitched it on for the mouth, use a cross stitch. Extra touch, I added a rustic flower to the base of the stem and twine.

This Primitive Pumpkin – Stenciled & Stitched is just the perfect piece of fall decor to make just about anyone smile!
Enjoy your Stenciled Stitched Primitive Pumpkin!
This post may contain affiliate links, when you make a purchase, we earn a commission at no extra cost to you this helps to keep this website up and to continue to bring you awesome projects like this one!
Ann Butler Design Products used:
Ann Butler Crafter’s® inks by Clearsnap, Tangelo
Ann Butler Art Screens by Clearsnap, Waves
Partner Products:
Other Products:
- Scrap Fabric: Brown, Green
- Buttons: Large (1), Medium (1)
- Stick
- Embroidery Floss-Needle
- Flower
- Blender Tool
- Muslin
Follow Ann Butler Designs on Facebook and Instagram for tons more stamped, inked and stenciled inspiration!
![]()


I hope you enjoyed my Primitive Pumpkin – Stenciled & Stitched, I sure had fun making him!
Until next time, Craft on……..

Comments
One response to “Stenciled Stitched Primitive Pumpkin”
Donna, this is too cool! I love the way you used the texture of the fabric to pick up the ink and highlight.
Leave a Reply