Your cart is currently empty!

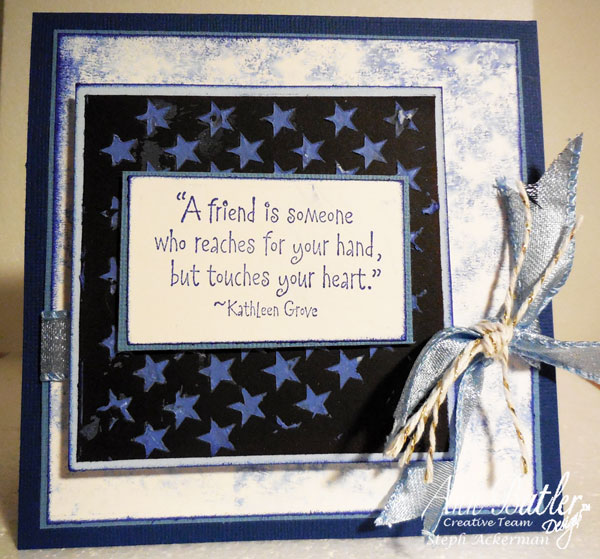
Stenciled Friendship Card
Hi everyone, Steph here today with a Stenciled Friendship Card.

Step 1:
To create the background I took the Star stencil that I used on another project, flipped it over then wiped a baby wipe over the stencil. This released the ink onto the white cardstock panel, which results in a water color effect, and while it does not look like a star stencil, I do love the result. And instead of cleaning residual ink off the stencil, you clean the stencil by actually creating another project!

Step 2:
Next, I mixed modeling paste with several drops of the Blueberry Reinker. Then I placed the Star Stencil on black cardstock and used the Blueberry modeling paste. I spread the Blueberry molding paste over the stencil. I was not looking for precision so you can see some incomplete stars on the cardstock.

Step 3:
Once dry I matted the black panel with white cardstock to which I had applied Blueberry Ink.

Step 4:
I wrapped the larger panel with blue ribbon then, adhered the panel to the card. I tied twine to the ribbon.

Step 5:
The black panel was added to the card with foam adhesives for dimension.

Step 6:
I stamped the phrase with Blueberry Ink, then embossed it with clear embossing powder. After inking the panel with Blueberry Ink, I matted it with blue cardstock and adhered it to the card.

So, what do you think of my Stenciled Friendship Card? It comes together so Quick and Easy.
This post may contain affiliate links, when you make a purchase, we earn a commission at no extra cost to you – this helps to keep this web site up and to continue to bring you awesome projects like this one!
Ann Butler Design’s Products used:
Ann Butler Crafter’s Ink and Reinkers by Clearsnap: Blueberry
Ann Butler ColorBox Art Screen, Stars
Other Products:
- Modeling Paste
- Cardstock: white, black, blue
- Sentiment stamp
- Foam adhesive
- Tape runner
- Ribbon
- Twine
- Scissors
Follow Ann on Social Media:
Thanks for stopping by.


Leave a Reply