Your cart is currently empty!

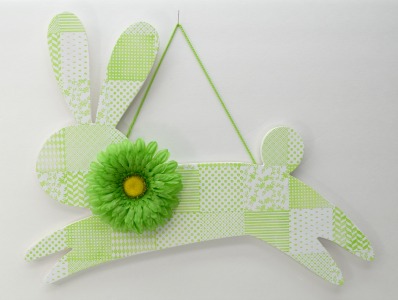
Stamped Spring Wood Bunny
Hi all, Donna here to share this fabulous Stamped Spring Wood Bunny! I had such a fun time with this piece!
This is a stamper’s dream, it was fast and has a great Spring feel! The faux quilt stamps make this Spring Bunny just adorable and would make just about anyone smile!
Shall we get started?
Step 1:
Gather all supplies you may need.
(After stamping this in a few colors, I decided to start over and use just one. I am sure glad I did!)

Step 2:
Paint bunny white using Deco Art Americana White and let dry.
Step 3:
Using a pencil and a ruler mark your stamp guidelines.

Step 4:
Start stamping your design using Ann Butler’s Crafter’s Ink in Limelight and her 2′ quilt stamps.

Step 5:
Once stamped all over, heat set to make sure the ink is dry.

Step 6:
Adhere a flower or a bow to the neck of the bunny. Adhere ribbon or string to hang. (Optional)

This post may contain affiliate links, when you make a purchase, we earn a commission at no extra cost to you – this helps to keep this web site up and to continue to bring you awesome projects like this one!
Ann Butler Design Products used:
Ann Butler Crafter’s Ink by Clearsnap, Limelight
Ann Butler Designs Faux Quilting Stamps, assorted 2″
Other Products used:
- Wood Bunny, Target Dollar Spot
- Flower
- Beacon 3-in-1 Adhesive
- Miscellaneous String
- Deco Art Americana Acrylic Paint, White
- Paint Brush
- Pencil
- Ruler
I could not be happier on how this Stamped Wood Spring Bunny turned out! Super easy, fun and fast! This is one of those crafts you can have done in one hour and feel very accomplished. You could use this as a gift. Hang it in your home, or on your door to greet your guests. Add this to a centerpiece or pop it on the mantel. So many options for this Stamped Wood Spring Bunny!
Make sure you stop by often and see what the rest of the Design Team is up to! Thanks for stopping by and I sure hope you enjoyed this Stamped Wood Spring Bunny!
Follow Ann on Social Media:

Till next time……Donna Budzynski


Leave a Reply