Your cart is currently empty!
Rubber Stamped Fall Wreath
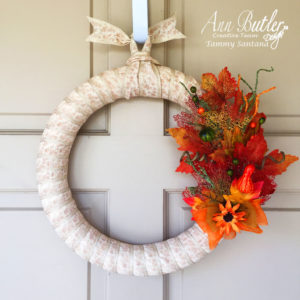
Hi, everyone, Tammy here with you today with a fun Rubber Stamped Fall Wreath tutorial featuring Ann Butler’s Faux Quilting Stamps.

I just love Fall colors and I love to create unique home decor items for my home. This wreath is one of a kind since I stamped the ribbon to add additional interest. Here is how I created the wreath.
Supplies:
- Ann Butler Faux Quilting Stamps
- Ann Butler Crafter’s Inks
- Fall themed embellishments
- Smoothfoam wreath form
- Adtech hot glue gun
- Adtech hot glue sticks
- Ribbon
- Glue Dots
Directions:

Use the 1 1/4 inch ribbon of your choice and stamp with Ann Butler’s Faux Quilting stamps and Ann Butler’s Crafter’s Ink in the color Desert Sand.

Use a Smooth Foam wreath form and place Glue Dots where you would like to start wrapping the ribbon.

Place ribbon on top of Glue Dots and start wrapping around the wreath form, keeping the ribbon spaced evenly around the form.

Use a Glue Dot to secure the ribbon at the end of wrapping around the form.

When the ribbon is wrapped around the form check to see if all of the ribbon is equally spaced.

Secure Fall embellishments of your choice with a hot glue gun.

Use an additional piece of ribbon to tie a slip knot at the top of the wreath to hang from a wreath hook.
That’s it! I really love how this wreath turned out, plus the fact that is a one of a kind wreath because of the stamped ribbon. I hope this gives you some unique Fall decor ideas using Ann Butler’s Faux Quilting stamps and Crafter’s Ink.

Leave a Reply