Your cart is currently empty!

Red Work Inspired Sampler Part 4 – Finishing Touches
Hi everyone, this is Chantal here, with the Finishing Touches for our Red Work Inspired Sampler. First, may I say thank you to all of you for stitching along with me for our Red Work Inspired Sampler featuring Ann Butler’s Crafter’s Inks and Background Stamps from Clearsnap. I hope you have enjoyed learning new stitches while combining stamping on fabric, and if you are a seasoned stitcher, the joy of continuing to work with needle and thread. I would like to share with you a few of the Finishing Touches ideas and inspirations and as always a few Success in Stitching tips.

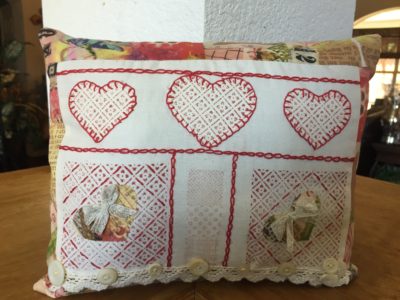
I chose to create a pillow with my sampler using a simple quilting technique by creating a border on the outer edges and adding mother of pearl buttons to the back. The possibilities are endless on what you can do with your sampler, so sit back, pour a glass of sweet Ice Tea and let’s get started on the finishing touches of our sampler….

- Trim all threads close to the stitching and press sampler from the backside or use a pressing cloth
- Cut fabric strips to the desired width plus seam allowance.
- Pin 1 fabric strip to the left side and one to the right side, right sides together and aligning raw edges. Using sewing machine, sew a straight stitch

- Trim threads; press seams to one side.
- Pin 1 fabric strip to top and 1 fabric strip to the bottom, right sides together, aligning raw edges and sew as in step 3.

- Trim threads; press seams to one side.
***Add lace, buttons or embellishments, if desired.

- Cut a second piece of fabric, larger than the size of the now pieced sampler.
- Cut the piece in half, fold over extra fabric on one side so as to make the two pieces equal to the pieced sampler.

- Pin right sides together; stitch around all 4 sides. Trim corners; turn right side out. Press to flatten seams.

- Fill the pillow with down, fiberfill or choice of stuffing. Pin closed

- Sew buttons to back of pillow to close opening.

Success in Stitching Tips
*When trimming threads be sure to trim close to the fabric and press threads so they are not visible when finishing the sampler
* To frame the sampler, use a mat to keep the glass from resting directly onto the sampler.
*This sampler (depending on the size) would also make a lovely pocket for a hostess apron!!
*Try to avoid using the sticky back canvas as overtime; it could damage your sampler.
*When pressing embroidery or needlework, use a pressing cloth or press from the back so as not to damage the stitches.
*When using red embroidery thread, DMC is the only true colorfast in red, meaning it will not run or smear if it gets wet.
*Your sampler is a work of art and a work of your heart…treasure it, create more and explore new embroidery!!!
This post may contain affiliate links, when you make a purchase, we earn a commission at no extra cost to you – this helps to keep this web site up and to continue to bring you awesome projects like this one!
Ann Butler Design Products used:
Ann Butler Crafter’s Ink by Clearsnap in Canyon
Ann Butler Faux Quilting Stamps
Other Products:
- Muslin
- Heat tool
- DMC embroidery floss
- Embroidery needle
- Straight Pins
- Scissors
Follow Ann on Social Media:


Leave a Reply