Your cart is currently empty!
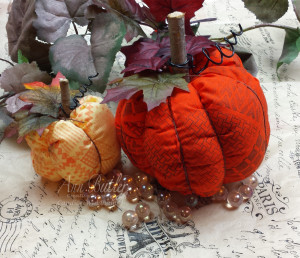
Puffy Stamped No-Sew Fabric Pumpkins
I have been in love with fabric stamping since I first discovered rubber stamping in the early ’90s. Being able to create your own custom fabric for your projects adds an extra bit of distinction, and Ann Butler’s quilt stamp designs give the perfect homey touch to autumn home decor.

Here’s how I did it:
Supplies
- Ann Butler Design Background Basics Stamps (Clearsnap)
- Ann Butler Design Faux Quilting Stamps (Unity Stamps)
- Ann Butler Design Crafter’s Ink, Deep Woods and Tangelo (Clearsnap)
- Broadcloth, orange and yellow, about 1 /4 yard per pumpkin
- Acrylic block, 5″ x 7″
- Double stick tape (Sookwang)
- Hemp, brown, about 1 1/2 yards per pumpkin
- Twigs, 1″ diameter by 3″ long
- Beacon Fabri-Tak Adhesive
- Black floral wire, 1/16″ diameter, 8″ per pumpkin
- Polyester Stuffing
- Silk leaves, 2-3 per pumpkin
Instructions
Cut fabric into rectangles twice as wide as they are tall. For fatter pumpkins, make the width wider. For taller pumpkins, increase the height.
Orange Fabric with Large Stamps
Place double-stick adhesive on your acrylic block and align two of the large stamps one above the other. This makes it much easier to get your lines straight. Stamp diagonally using Deep Woods ink. Repeat vertically to make one line of stamped blocks. Apply two different stamps to the block and repeat, aligning these stamps adjacent to the original stamps. Continue changing back and forth between the two images until you have filled the fabric.


Smaller Stamps on Yellow Fabric
Attach six of the smaller Faux Quilting Stamps to the acrylic block and stamp with Tangelo Crafter’s Ink, leaving about 1/2″ distance all around each impression.

Ink one of the Background Basics Stitching Stamps with Tangelo Crafter’s Ink and stamp in the spaces between the Faux Quilt Blocks.


Heat set the inks if desired.
Finishing
Fold down and press a 3/4″ strip along the width of the fabric and adhere with Fabri-Tak adhesive, placing the adhesive close to the fabric edge and leaving a 1/2″ unglued pocket along the edge

Fold the fabric along the long edge front to front, so that the back side is showing and apply adhere Fabri-Tak, creating a 1/2″ seam along the edge where the fabric comes together. Allow both glued seams to dry thoroughly.

Gather the unglued edge of the fabric and tie with about 6″ of hemp. Place a small drop of Fabri-Tak Adhesive on the knot to secure.

When all the adhesive is dry, turn the fabric so that the stamped side is facing out. Attach a small safety pin to the end of 12″ of hemp and thread it through the pocket along the width of the fabric, pulling the hemp until the edge is gathered loosely.

Stuff the resulting pumpkin with polyester stuffing until full. Pull the hemp tightly and tie it in a knot. Wrap the remaining piece of hemp around the pumpkin to create 4-8 sections, tying it at the top/bottom each time you wrap it.
Apply Beacon Fabri-Tak Adhesive to the end of the twig and push it into the top of the pumpkin.

Attach 2-3 silk leaves to the pumpkin around the bottom of the twig with Beacon Fabri-Tak Adhesive. Curl the floral wire into a spiral and wrap it around the twig base.

That’s it. Easy as pie, and you now have the beginning of a beautiful Thanksgiving centerpiece which can be used year after year.

Comments
One response to “Puffy Stamped No-Sew Fabric Pumpkins”
Gorgeous! Absolutely gorgeous. Thank you for sharing.
Leave a Reply