Your cart is currently empty!

Patriotic Treat Bags
Hi everyone, Donna here to share some fun Patriotic Treat Bags!
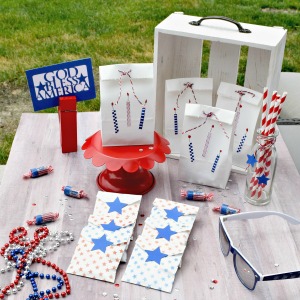
July is just around the corner and these Patriotic Treat Bags will look fantastic on your picnic table!
I will show you how to make two different Patriotic Treat Bags, one larger and one smaller.
They are fun and quick to make and give a POP, BANG, BOOM impression!
Guess What?
You won’t even spend a lot of time on them either!
I won’t tell, if you don’t!

- Gather all materials.

2. Stamp 3 different designs using Ann Butler’s ColorBox Background Basics Stitch Stamps, with Ann Butler’s ColorBox Crafter’s Ink in Canyon and Blueberry.

3. Trim the stamped stitches using either a scissors or a paper trimmer. Cut the size of firecracker in proportion to the bag. Adhere with a tape runner.

4. Using a black marking pen, draw a line for the fuse. Add a touch of glue to the top of fuse and add red glitter.

5. Finish the bag by folding over the top and punching two holes in the center area. Fill the bag with treats and prizes and then, tie shut.


Second bag!
- Using the Ann Butler’s ColorBox Art Screen, Stars, lay over a small treat bag. Use ColorBox Blender to blend ColorBox Crafter’s Canyon over the Star Art Screen. Repeat with ColorBox Crafter’s Blueberry.


2. Using my Cricut Explore Air 2 I cut out blue stars for closures. Once you fill bags with treats, add a Glue Dot® to the star and close bag.

Now sit back and enjoy the party!

This post may contain affiliate links, when you make a purchase, we earn a commission at no extra cost to you – this helps to keep this web site up and to continue to bring you awesome projects like this one!
Ann Butler Design Products used:
Ann Butler Crafter’s Ink by Clearsnap in Canyon, Blueberry
Ann Butler ColorBox Basic Stitch Stamps
Ann Butler ColorBox Art Screen -Stars
Partner Products:
Products:
- Paper Sacks 3.5″ X 6.75″
- Small Bags 3″ X 4 1/2″
- Black Marker-Fine Line
- Glue
- Red Glitter
- Cardstock, blue
- Paper Trimmer
- Scissors
- Die Cut Machine – Stars
- Glue Dots®
- Prizes and candy of choice


Leave a Reply