Your cart is currently empty!

Inked and Stamped Fall Acorn Banner
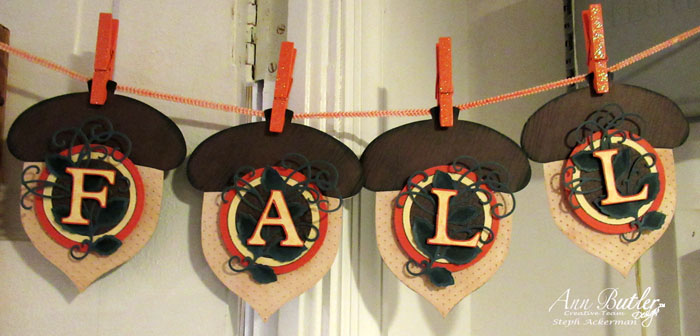
Hi everyone, Steph Ackerman here today getting ready for Fall with a Inked and Stamped Fall Acorn Banner.

I created an Inked and Stamped Fall Acorn Banner using an assortment of Ann Butler’s stamps and inks.

Step 1:
Emboss the acorns with a Cuttlebug embossing folder. Then use Desert Sand Ink over the embossed acorns for definition.

Step 2:
Emboss the acorn toppers with another Cuttlebug embossing folder. Then use Deep Woods Ink over the embossed acorn toppers.

Step 3:
Die cut 3 concentric circles and stamp with the ColorBox Background Basics by Ann Butler – Basket 1 stamp – on the smaller circles with Deep Woods Ink.

Step 4:
Using Tangelo ink and the Faux Quilting Leaves All Over Square 2″ stamp, repeatedly stamp the design on cream cardstock. Die cut the letters with Cricut or Alphabet dies and Big Shot.

Step 5:
Die cut leaf sprays from cardstock and, while still in the die, ink them with Deep Woods Ink for definition.

Step 6:
Using Tangelo Ink, color the trim to coordinate with the banner. Heat set.

Step 7:
Assemble the banners placing the circles on top of each with foam adhesives. Pop the letters on top of the leaf sprays.

Are you ready for fall? It is here and the leaves are changing…enjoy!
This post may contain affiliate links, when you make a purchase, we earn a commission at no extra cost to you – this helps to keep this web site up and to continue to bring you awesome projects like this one!
Ann Butler Design’s Products used:
Ann Butler Crafter’s Ink by Clearsnap: Desert Sandy, Deep Woods, Tangelo
ColorBox Background Basics by Ann Butler: Basket 1
Ann Butler Faux Quilting Stamps, Leaves All Over, Square 2″
Other Products:
- Cardstock: Cream, Brown, Green Orange
- Big Shot
- Dies, Spellbinders
- Cricut Expression
- Embossing Folders, Cuttlebug
- Trim
- Clothes Pins
- Foam Adhesives
Follow Ann on Social Media:
Thanks for stopping by.


Leave a Reply