Your cart is currently empty!

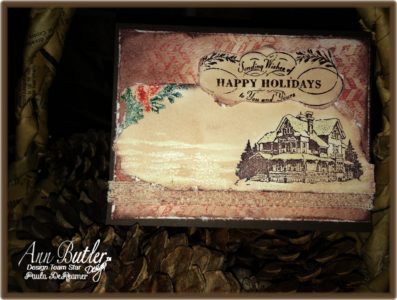
Mixed Media Happy Holidays Card
Hi Everyone! Paula here with today’s project. It’s hard to believe that the holiday season is upon us, but I have to say that I am really excited! It’s time to start thinking about cards! Ann Butler’s new stencils and new colors of Crafter’s Inks were just the right combination for me.
Here’s how I made this card:
1. I started by stamping the chevron pattern from Ann Butler’s 2″ Leaves All Over Faux Quilting Stamps in Colorbox Crafter’s Ink by Ann Butler in Canyon. This is one of the new colors and I LOVE it! I stamped this on watercolor paper and loved the effect!
2. Although I love the look, I wanted a bit more muted colors, so I started by sponging Colorbox Crafter’s Ink by Ann Butler in Sand, then again with Colorbox Crafter’s Ink by Ann Butler in Bark (also two new colors!!)
3. Next, I stamped a winter cottage scene onto ivory cardstock using the Bark ink. I chose a holiday sentiment and again, stamped in Bark. While the ink was still wet, I embossed with Colorbox Embossing Powder in Clear. Excuse the image, as I could not get a crisp photo of this. After embossing the image, I cut it out around the image itself. I wasn’t trying to be perfect, just not too close to the image.
4. Love this next step. Using Colorbox Art Screens by Ann Butler (NEW!!),  I was able to make a “snow” theme on my card. This particular stencil worked perfectly. To get this effect, I used a watermark stamp pad, Colorbox Clear Embossing Powder, and Clearsnap Glitter in Winter Frost. I started by stamping the watermark stamp pad over the stencil in various locations (where I wanted my snow banks), then sprinkled with a mixture of the embossing powder and glitter. Then heated. I did this a couple more times to get the desired effect. To get the ‘snow glitter’ on the house rooftop, I used a blending pen, dipping on the watermark ink pad and then coloring over the area I wanted, then added the embossing powder/glitter , and heat again.
5. To make the snow “pop” a bit more, I sponged more Colorbox Crafter’s Ink by Ann Butler in Sand all over the card. The white snow will now really show up. I then added another stamped image in the corner of a couple redbirds on a pine branch. To do this, I used a blender pen, dipping on the ink pad, coloring the specific area of the stamp with one color, then the second color (colors used were the new Crafter’s Ink in Canyon and Crafter’s Ink in Deep Woods). Did I say I love these new colors??
6. Now back to the base of the card – the chevron design in Canyon. I added a piece of vintage lace, and sponged it in a bit of Bark ink.
7. I wanted a bit more of a distressed look, so I took my scissors and ran it along the edge of every individual piece. Some I ripped a bit more, some not so much. After distressing the edges, I did ink just a bit more around them.
Last step – just put it all together. I can’t wait to use these new inks and stencils again!!

I hope you enjoyed this card. Thanks for stopping by!


Leave a Reply