Your cart is currently empty!

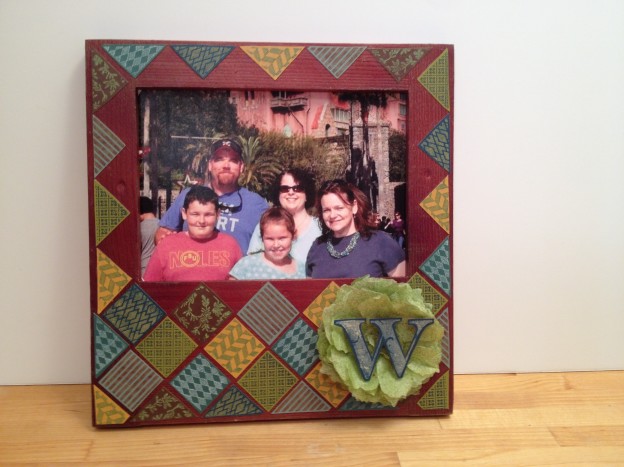
Faux Quilted Picture Frame
I love taking something traditional like quilting and putting a contemporary twist on it with a modern color palette. I also love creating home decor items, so I created this frame to coordinate with the Faux Quilted Box that I posted in February.
Here’s how I made it!
- Ann Butler Designs {Faux Quliting} Stamp sets – 1″ Diamonds & Plaids, 1″ Doily Picnic and 1″ Leaves All Over.
- EZ De’s Ann Butler Stamps – Flourish 2″ ABC’s
- Colorbox Crafter’s® by Ann Butler – full size ink pads in Aquamarine, Sunshine, Lilac and Limelight.
- Colorbox Crafter’s® – full size ink pads in Snow and Bark.
- Kraft Core Nostalgic Collection by Core’dinations
- Wooden Picture frame – craft store.
- Design Master Colortool Spray – Walnut Wood Tone.
- Beacon Adhesives – Fast Finish Decoupage and Premium Tacky Glue
- Alterations Sizzix Bigz Die – Tattered Florals
- Sizzix Big Shot Pro Die Cutting Machine.
- Scissors, Clear Acrylic Stamping Blocks, bright green tissue paper, 3D foam adhesive, craft knife, newspapers and a Brad.
INSTRUCTIONS:
1.) In a well ventilated area, spread out newspapers and spray several light coats of Design Master Walnut Wood Tone on frame, let dry completely.
2.) Stamp a variety of the patterns on coordinating card stock colors and cut out with scissors. Dry fit on frame until you are happy with the pattern and color arrangement. Attach to frame with Fast Finish Decoupage, let dry.
NOTE: Now this is where you do what I SAY instead of what I DO. As you are attaching your Faux Quilt pieces to your frame, work one piece from the right and one piece from the left until you reach the center. This will allow you to space all pieces evenly. I DID NOT DO THIS, so I ended up with a large space at the right side of the frame. This is where a redesign comes in to play!
3.) Die cut bright green tissue paper with the Tattered Florals die, concentrating on the largest flower. Separate layers, lay out on newspapers and lightly mist with Design Master Walnut Wood Tone, let dry. Stack flowers, cut a small slit in center with craft knife and insert brad through all layers. Spread prongs, flatten and attach to frame with Premium Tacky Glue. Crinkle petals for texture.
4.) stamp initial of choice on card stock of choice. Fussy cut with scissors. Stack 5 layers of 3D foam adhesive to back of initial and attach to center of flower. Fill frame with favor family photo and display for all to enjoy!
Thanks for stopping by! -Beth
Comments
2 responses to “Faux Quilted Picture Frame”
Beth, love what you made. Do you use a laser square or ‘eyeball -it’?
Beth I love this project, a great use of my stamps!


Leave a Reply