Your cart is currently empty!
Faux Quilted Foil Card
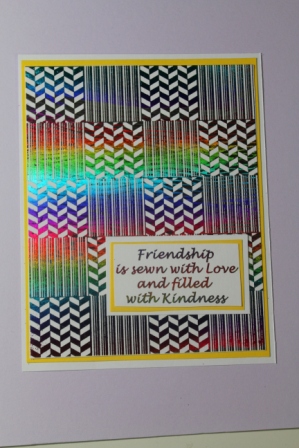
I love Foil and the fact that therm-o-web has come out with it in the perfect size for card making! I also love that I am able to combine it with my stamp line and today I am showing you how-to create a Faux Quilted Foil Card.

I started with a 1″ square from the Leaves All Over and the Stripes. Dots. & Hearts stamp sets. I began by stamping a pattern onto a sheet of white card stock with ColorBox® Archival Dye Ink in Wicked Black.

I alternated with the two stamps to create a pattern 4 wide by 5″ high.

I then had photocopies made of the design I stamped out. Please note: in order for the foil technique I am doing to work, you will need photocopies from a laser printer of your original, this technique will not work with using ink or an inkjet printer. Trim to desired size.

Place foil on top of your design and sandwich it with a folded piece of copy paper…

Place the folded side of the sandwich into a laminator. The laminator I am using is one that I have had for years, I do not believe it is sold any longer, there are many new ones on the market but if you do not have one….no worries…

You can do this technique with an iron as well. Simply layer your design with foil and a sheet of copy paper and iron. Be careful not to go back and forth, simply hold the iron in one place for 10 – 15 seconds, lift and move the iron and repeat.

Pull the foil away and you will see that it adheres to your design. Start by lifting at one corner, if needed, place the foil back down and iron again.

I stamped out some sentiments and made photocopies of them also.

I put these through the laminator also…

They turned out…

PERFECTLY!

The design I foiled was 4″ x 5″, to layer and create a card I cut a piece of yellow card stock 4 1/4″ x 5 1/4″ and a piece of white card stock 9″ x 5 1/2″ (which I folded in half to create a card base that is 4 1/2″ x 5 1/2″). I also cut a piece of yellow card stock 1/4″ larger and a piece of white card stock 1/2″ larger then the sentiment I chose. Attach the design to the yellow card stock and then to the card base. Then, attach the sentiment to the yellow card stock and then to the white card stock and adhere to the card front as desired.
Ann Butler Design Products used:
Partner Products:
- therm-o-web Deco Foil™ Transfer Sheets, Rainbow
- therm-o-web ICraft Adhesive™ Tape, 1/2 inch
- ColorBox® Archival Dye Ink, Wicked Black
other products:
- Card stock: white, yellow
- Laminator or Iron
- Paper trimmer
- Scissors
- Laser printer
- Copy paper
Follow Ann on Social Media:
![]()


Comments
3 responses to “Faux Quilted Foil Card”
I love this! I can’t wait to try this technique.
I love this and can’t wait to try this also.
It is a cool Technique!
Leave a Reply