Your cart is currently empty!

Fabric FOB with Crafter’s Ink
Hey y’all, this is Chantal. Today, we are taking a little break from stitching to check on our supplies and how we store and organize them with beauty and creativity. We can make beautiful accessories for our “tools” such as scissors, pins and needles and even our threads.

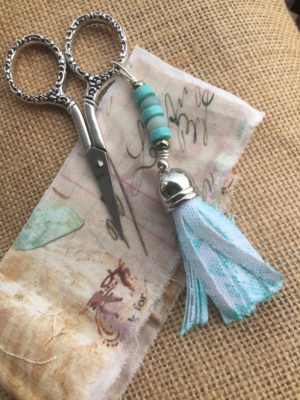
This little tassel and beading project, featuring Crafter’s Inks and Background Stamps by Ann Butler, is for our scissors. Its proper name is a Scissor Fob, just like the one for keys, only prettier…Actually you could make another one for your keys. Let’s get started…
Step 1:
 Using a die and a die cutting machine or creating a template (see below for directions), cut a piece of fabric such as denim, canvas or linen for your tassel.
Step 2:
 Place the fringe fabric on a paper pad. Using Aquamarine Crafter’s Ink and one Background Stamp of your choice, ink the stamp and randomly stamp the fabric. Heat set with an iron.
Step 3:
 With Fabri-Tac, run a small line of adhesive at the top of the fringe on the back of the fabric.
Step 4:
 Begin to roll the fringe, creating the tassel for our scissor fob, being sure to keep it straight along the top of fabric. Secure the end of fabric with a little more adhesive.

Step 5:
 With the tassel in hand, add adhesive to the top; add adhesive to the inside of the large bead cap (generally used for leather) and push the tassel into the cap. Set aside to dry. You can add more ink at this time, if desired.
Step 6:

 Gather wire, beads and pliers. Cut desired length wire. Thread the wire through the loop at the top of the bead cap and wire wrap the tail.
Step 7:
 Thread beads in desired pattern. Thread the wire through the scissors or a split ring; bring wire over the and close with a loop and wire wrap the tail. Trim any excess wire


Success in stitching tips

- To create a template for the fringe piece like the one I used, measure and cut a 4 ½ X 2 ½ rectangle from tracing paper. Lay the template on fabric and pin; cut rectangle, remove pattern. Cut fringe lines every ¼ inch leaving at least ½ inch at the top.
- Join 2 or more fringe sections to create larger tassels.
- Ink the back of the tassel also –either with the same stamp as in step 2 or just with the small ink pad in the same color.
- You can use a split ring or another type of ring to attach the wire and the scissors.
- Create different color tassels to signify different scissors such as ones for: paper, embroidery, sewing, etc…
For your convenience, this post may contain affiliate links, when you make a purchase, we earn a commission at no extra cost to you – this helps to keep this web site up and to continue to bring you awesome projects like this one!
Ann Butler Design Products used:
Ann Butler Crafters Ink by Clearsnap, Aquamarine
Ann Butler Background Basics by Clearsnap
Partner Products:
Other Products:
- Cotton, canvas or denim fabric
- Sizzix die –Movers and Shapers die set 3 pk-tassel maker or fringe template
- Big Shot, optional
- Bead Cap
- Wire
- Pliers
- Glass and Stone Beads, assorted
- Small scissors

Comments
One response to “Fabric FOB with Crafter’s Ink”
Very fun!
Leave a Reply