Your cart is currently empty!

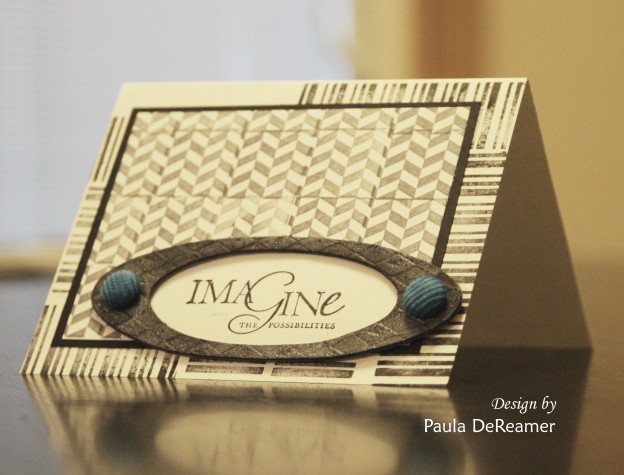
EZ-De’s Stamped Graduation Card
Hi everyone. Paula here with today’s project. It’s Graduation season and we have LOTS of graduation open houses to attend. With having so many parties, I needed some “quick and simple” cards.
 Supplies:
Card base – White cardstock 8.5″ x 5.5″, folded for 4.25″ x 5 .5″ final size
Cardstock – black (used for mat), cut to 3.5″ x 4.75″
Cardstock – white, cut to 3.25″x 4.5″ and small scrap piece
Oval chipboard (this is old, so unsure which company to credit)
Corduroy brads – Stampin’ Up (retired)
Ez-De’s 1″ Rail Fence Set Ann Butler Designs
Faux Quilting by Ann Butler 1″ Leaves all Over
Earth Safe Finishes Silver
Step 1: Using the 1″ stripe from the Rail Fence Set A, ink and off stamp on scrap paper first. I wanted a very random pattern as my background, so I would stamp in vertical, then horizontal directions. (Please note that this image is not what I finally used- I started doing all one direction but I didn’t like it). 
Step 2: I used a 1″ from the Leaves All Over set, stamp the entire background. If you “slightly” overlap the rows, you will get an appearance of a thin border in between. 
Step 3: Adhere the cardstock layers together.
Step 4: I used a sponge with black ink to color the chipboard. I then used the Earth Safe Finishes in silver to give a shimmer, rubbing it over the edge with my finger.
Step 5: Stamp a sentiment of your choice on a scrap piece of white cardstock. I cut this to size to fit under my chipboard. Adhere to the back of the chipboard. Put the brads in the chipboard (I did not push these through the cardstock – this piece just has adhesive on the back and attached the card base. 
And as mentioned – VERY quick and simple! If you’re doing an assembly, you can do multiple of these, or switch it up and change the designs, which is what I did!
Have a great day! Thanks for stopping by!
Paula
Comments
One response to “EZ-De’s Stamped Graduation Card”
Great card and nice showcasing of the stamps by Ann Butler


Leave a Reply