Your cart is currently empty!

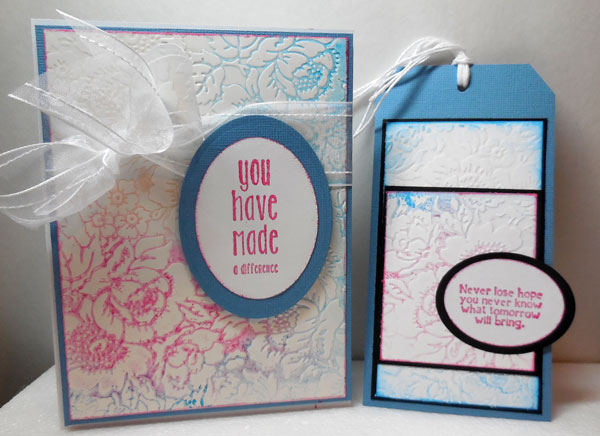
Embossed Rose Card and coordinating Tag
Hi everyone, Steph Ackerman here today with an embossed rose card and coordinating tag.

Ann Butler’s Colorbox Crafter’s Inks are made to work on most surfaces. They work extremely well on fabric, plastic, glossy papers and more.
Using an embossing folder, I placed Berry, Aquamarine, Tangelo and Limelight Crafter’s Ink directly onto the embossing folder.

Next, place a sheet of glossy cardstock in the embossing folder. The colors are extremely vibrant.

Once embossed, remove the glossy cardstock.
Since ink still remains, on the embossing folder, place 2 smaller sheets of cardstock inside and emboss them to get a second generation print.

Look at the gorgeous colors! The glossy cardstock is more vibrant than the cardstock panels.

Don’t you love the debossed effect? The colors are embedded in the cardstock panels and really bring the roses to life. Wrap the panel with ribbon. Stamp and emboss the sentiment. Die cut and add to the card with foam adhesives for dimension.

Using the smaller cardstock pieces, lightly ink the edges then mat them with cardstock. Create a tag from blue cardstock and add the smaller panels. Stamp and emboss the sentiment then die cut it
Add to a larger die and adhere to the tag.

You can see how different the embossed rose card and coordinating tag look with the different papers used.

This post may contain affiliate links, when you make a purchase, we earn a commission at no extra cost to you – this helps to keep this web site up and to continue to bring you awesome projects like this one!
Ann Butler Design Products used:
Ann Butler Designs ColorBox Crafter’s Ink: Aquamarine, Limelight, Tangelo, Berry
Partner Products:
- Clearsnap – ColorBox Embossing Powder
- Unity Stamp Co. – Sentiment Stamp
- Elizabeth Craft Oval Dies
Other Products:
- Cuttlebug Embossing Folder
- May Arts Ribbon
- Whisker Graphics Twine
- Glossy Cardstock, White
- Cardstock
- Die cutting machine
Follow Ann on Social Media:
Thanks for stopping by.


Leave a Reply