Your cart is currently empty!

DIY Crafted Rosettes and Stamped Treat Bags
Hello, it’s Graciellie and today I want to show you an easy and elegant way to customize pretty treat bags for Valentine’s. Ann’s stamps and Crafter’s inks were key during the process of making these projects I’m showing you today!
 Main supplies
Colorbox Background Basics by Ann Butler
Colorbox Crafter’s Inks by Ann Butler in Sunshine
Colorbox Crafter’s Inks in Bark and Snow
Colorbox Background Basics by Ann Butler – Basket 1 and Picnic 1
Colorbox Color Blender
Other supplies
Velcro Mini Fasteners – Round 3/8″ Dots
Westcott Titanium Bonded Trimmer and Titatium Non-stick Scissors
Ad-Tech Crafter’s Tape
Enviromental Technologies Easy Cast Resin and Easy Mold Silicone Putty
Miscelaneous
Grip Liner
Leather textured cardstock
White tulle
Linen thread
Jute twine
Vintage button
Resin flower
staple
Mini tag
I absolutely love the final look of these pretty treat bags, but for them to look like this I had to create every single thing from scratch. That’s right! The embellishments, the bags themselves were all made from scratch! Let me start with how I made those vintage looking rosettes:
1. Get a roll of white Grip Liner and your choice of Ann Butler’s Crafter’s Inks. I made one yellow rosette and a vintage brown one (mixing Sunshine and Bark to create a lighter brown).

2. Color a section of the Grip Liner pressing the ink pad directly onto it.

3. Tap lightly the colored section with a clean cloth if needed. Since I wanted a weathered look, doing this made the hues softer.

4. Cut strips from the colored Grip Liner. The width of the rosettes is your choice, but remember that you can always trim them after they’re done if you want them smaller.

5. Use a wide piece of two sided tape as a base and start putting the rosette together. You won’t be able to stick completely the strip, but it will help you put the structure of the rosette together. In the end, add a generous amount of silicone glue to the center of the rosette so that it stays put.

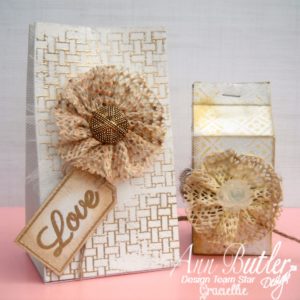
6. Embellish the center of the rosettes as desired. I added a vintage gold button to the brown rosette and a clear resin rose to the yellow one. In the end, I decided I would darken the edges of the yellow rosette with a mix of Sunshine and Bark inks, and I also added a large tulle rosette to the back of the brown one.

I find this is a GREAT way to get the most out of everyday materials and upcycle them!
The treat boxes were made out of a digital template and a gift bag punch board. To make them unique I roughly stamped them (before putting them together) with the new Background Basics stamps by Ann Butler. They are large and made the job easy! To make the stamping uneven, after inking the stamp I cleaned parts of the block. That technique gives a nice worn, mixed media look to any project! I used Sunshine ink for the smaller box and snow on the large bag to heat emboss it in gold. I completed the treat bags with jute twine, linen thread and a “love” tag I sponged with a mix of Bark and Sunshine inks. To close the bags I simple stapled the smaller one and then on the large one I adhered a set of mini Velcro fasteners.
I hope you enjoyed today’s post. Thanks for stopping by!
Comments
One response to “DIY Crafted Rosettes and Stamped Treat Bags”
such a smart idea! I love it!

Leave a Reply