Your cart is currently empty!

Creating a Rhinestone Watercolor Card
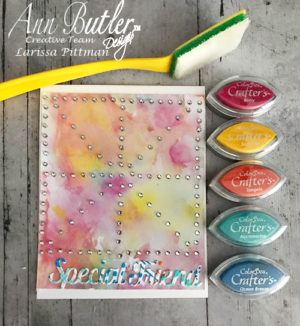
Hello friends. Larissa here today showing you how I created a Rhinestone Watercolor Card.
You can achieve a watercolor look without using a brush.
Step 1:
First I took a piece of acetate and smooshed a few different ink colors on it. I then sprayed a little water on it and smashed the piece of white cardstock on it a few times. I used my heat gun to dry it completely before moving on. If you are not seeing the colors you desire at this point since the cardstock is dry you could always add more color. Since I am not using watercolor cardstock here, I would make sure to dry completely in between so that your cardstock does not get saturated with water.

Step 2:
Next, following the manufacturer’s instructions, I placed the magnetic rhinestone pattern on a cookie sheet and poured the rhinestones on top. Using the little brush I pushed the rhinestones in each little circle. I placed the sticker sheet on top to adhere the rhinestones and pulled the pattern up. Then, I placed the sticker sheet onto the card front and ironed, again following the manufacturer’s instructions.

Step 3:
With some scrap pieces of paper from another project I die cut the sentiment out and adhered it to the front of the car using liquid adhesive.

You could use one. two or more colors of ink, if you chose.

I hope you enjoyed my post today and you give this Rhinestone Watercolor technique a try.
For your convenience, this post may contain affiliate links, when you make a purchase, we earn a commission at no extra cost to you – this helps to keep this web site up and to continue to bring you awesome projects like this one!
Ann Butler Designs Products Used:
Ann Butler Designs ColorBox Crafter’s Inks: Ocean Breeze, Aquamarine, Tangelo, Sunshine and Berry
Other Products:
- Big Shot
- Crafter’s Companion sentiment die
- Cardstock
- Tombow Liquid Adhesive
- Heat tool
- Iron
Follow Ann on Social Media:


Leave a Reply