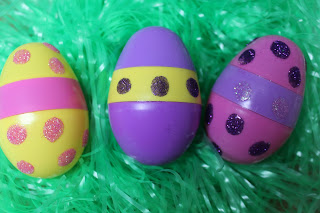
Let’s Glitter up those Easter Eggs with this quick and easy craft project…perfect to do with the kids!
- You will be sprinkling out a lot of glitter but not using much…as a little glitter goes a long ways.
- Do one color of glitter at a time to keep from mixing colors together.
- Simply fold the copy paper in the middle to easily pour the left over glitter back into their containers.
This post may contain affiliate links when you make a purchase, we earn a commission at no extra cost to you this helps to keep this website up and to continue to bring you awesome projects like this one!
Products used:
- Plastic Easter Eggs
- Velcro® Brand Adhesive Dots
- Ultra Fine Glitter
- Dynasty Paint Brush, size 6
Check out these adorable Easter Bunny Gift Bags, they are quick and easy to make!
Inky Fun with Christmas Tags
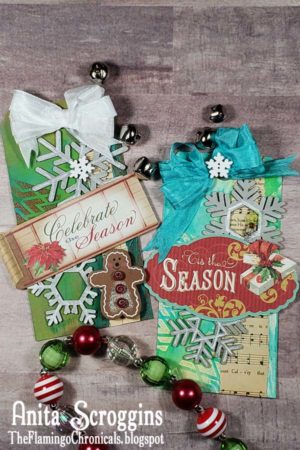
Are you ready for Christmas yet? Anita had some Inky Fun with Christmas Tags when she created these. They are quick and easy project to and perfect to add to those last minute gifts…you can make dozens quickly! Give it a try!
This post may contain affiliate links, when you make a purchase, we earn a commission at no extra cost to you this helps to keep this website up and to continue to bring you awesome projects like this one!
Ann Butler Design Products used:
Ann Butler Crafter’s® inks by Clearsnap: Limelight, Aquamarine
Background Basics Double Diamond Square Stamp
Partner Products:
- Colorbox Embossing Powder, Clear
- Colorbox Daubers
Other Products:
- Tags
- Ribbon
- Ephemera
Check out step by step instructions for creating these and to have your own Inky Fun with Christmas Tags simply click on the photo above or here!
Follow Ann Butler Designs on Facebook and Instagram for tons more stamped, inked and stenciled inspiration!
Enjoy,
Stamped Christmas Tea Towel
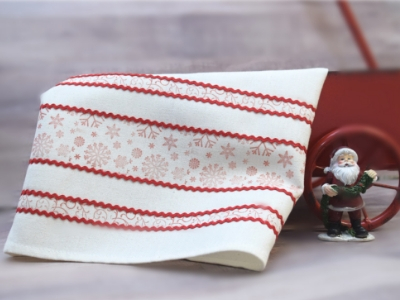
Well it is finally here, the hustle and bustle of holiday parties! Whether you’re the hostess or the guest, this Stamped Christmas Tea Towel will come in handy! The Stamped Christmas Tea Towel would make a wonderful addition to a holiday basket for the hostess, or a colorful addition to your kitchen.
Either way this Stamped Christmas Tea Towel will be used and loved!
Let’s get started!
Step 1:
Prepare fabric tea towel. Wash, dry with no dryer sheet. Iron. Gather all material needed.
Step 2:
Using a ruler mark your lines with a pencil or a marker that erases when it gets wet. The tea towel was as wide as my metal ruler, I used the ruler as my guide. Tape the ends of the ruler to the table you are working on over your towel. The ruler will also keep you stamping straight if you line up you stamp with the ruler. (See photo below)
Step 3:
Stamp across the towel using the 1/2″ X 2″ stamp. Move ruler one ruler space up, tape down and stamp using 2″ Snowflake Frenzy stamp. Repeat and stamp with 1/2″ X 2″ stamp.
Step 4:
Iron the stamped areas to set the ink onto the towel.
Step 5:
Using Beacon FABRI-TAC adhesive, run a bead of adhesive across the top of stamped area and lay ric-rac over the top and press down to make sure it adheres to the fabric. Repeat this step until you have top and bottom of stamped areas enclosed with ric-rac.
That’s it, you could make a dozen of these so quickly!
Reds, greens, pinks and teal, every color would be beautiful!
I hope you enjoy this Christmas Stamped Tea Towel!
This post may contain affiliate links, when you make a purchase, we earn a commission
at no extra cost to you this helps to keep this website up and to continue to bring you awesome projects like this one!
Ann Butler Design Products used:
Ann Butler Crafter’s® inks by Clearsnap, Canyon
Ann Butler Stamp Sets by Unity Stamp Company: Snowflake Frenzy, Flourish Wonder
Partner Products:
- Beacon FABRI-TAC
Other Products:
- Tea Towel
- Metal Ruler
- Iron
- Acrylic Stamp Blocks
- Tape
Follow Ann Butler Designs on Facebook and Instagram for tons more stamped, inked and stenciled inspiration!
I hope you enjoyed my Christmas Stamped Tea Towel – I sure had fun making it!
Until next time, Craft on……..
Stenciled Stitched Primitive Pumpkin
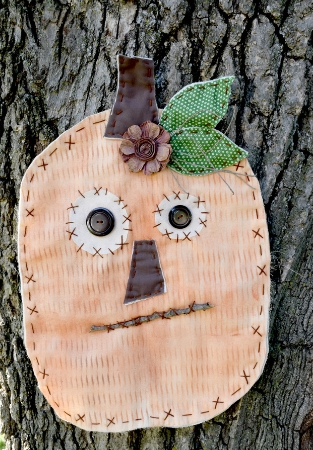
It’s PUMPKIN time! We have just the project you have been looking for! I have made a Stenciled Stitched Primitive Pumpkin to welcome friends and family into your home! This guy is so fun to create and super cute no matter where you hang him!
Although you can’t drink this pumpkin spice, I would say this Stenciled Stitched Primitive Pumpkin has a-latte spice!
Let’s get started!
Step 1:
Wash and dry all fabrics.
Step 2:
Lay out muslin, Warm and Natural, and one more piece of muslin on top of Warm and Natural. That is your sandwich. Using the end of pencil outline a oval shape (shape of pumpkin, your choice). Cut out.
Step 3:
Cut out a brown stem and green leaves, using the same sandwich method as above. Set aside. You can free hand or make a pattern by drawing out on paper first. I free hand mine.
Step 4:
Using narrow masking tape, tape down the center to start stencil with a straight line. Using a blending tool to apply the ink through the stencil. When one half was done, remove tape and rotate to other side using the same line. My blending tool was dirty with brown ink, so when blended with Tangelo it gave a burnt orange appearance. Once stenciled, I went back over it with the blending tool.
Step 5:
Heat set ink with iron.
Step 6:
Time to stitch! You can be super creative or just straight stitch all the way around the pumpkin. I did a straight stitch and a cross stitch mix. Stitch around leaves and stem also. Attach leaves and stem to pumpkin with straight stitch. You could stop here if you like. But I took it one step further!
Step 7:
Using muslin, cut out two circles. Circles must be bigger then buttons. Using brown fabric and Warm and Natural, cut a nose. Stitch muslin circles onto front of pumpkin, where you want your eyes to be. Stitch buttons on top of muslin circles. Stitch nose on. Using a stick from outside I stitched it on for the mouth, use a cross stitch. Extra touch, I added a rustic flower to the base of the stem and twine.
This Primitive Pumpkin – Stenciled & Stitched is just the perfect piece of fall decor to make just about anyone smile!
Enjoy your Stenciled Stitched Primitive Pumpkin!
This post may contain affiliate links, when you make a purchase, we earn a commission at no extra cost to you this helps to keep this website up and to continue to bring you awesome projects like this one!
Ann Butler Design Products used:
Ann Butler Crafter’s® inks by Clearsnap, Tangelo
Ann Butler Art Screens by Clearsnap, Waves
Partner Products:
Other Products:
- Scrap Fabric: Brown, Green
- Buttons: Large (1), Medium (1)
- Stick
- Embroidery Floss-Needle
- Flower
- Blender Tool
- Muslin
Follow Ann Butler Designs on Facebook and Instagram for tons more stamped, inked and stenciled inspiration!
I hope you enjoyed my Primitive Pumpkin – Stenciled & Stitched, I sure had fun making him!
Until next time, Craft on……..
Stuffed, Stamped Pumpkin Shelf Sitters
It’s Fall and it is time to get your stuffing out and make some Stuffed,
Stamped Pumpkin Shelf Sitters!
Please note: This post contains affiliate links. If you use these links and make a purchase, we earn a commission at no extra cost to you…
These Stuffed, Stamped Pumpkin Shelf Sitters are sure to get you into the mood of fall decorating and it is a super easy project for a first time sewer!
Let’s get started:
Step: 1
Wash and dry muslin fabric. Stamp pattern onto fabric using 2″ Faux Quilting rubber stamps of your choice. You can stamp wide or tall.
Step: 2
Press to set the ink.
Step: 3
Cut out front and back of stamped shapes, leaving about a 1/2″ seam allowance. Place right sides together. You can pin if you like. I did not.
Step: 4
Start stitching at top where the stem will be placed and work around to the opposite side of stem, leave it open for stuffing and stem.
Step: 5
Trim seams down, turn right side out. Press if needed. Stuff.
Step: 6
Once all are stuffed, heat glue gun and adhere sticks into pumpkins. Gather top around sticks and tie burlap to stick.
Now you have some fun fall Stuffed, Stamped Pumpkin Shelf Sitters. These can become fun little gifts. Using just one pumpkin, wrap some raffia around and attach some fall lip balm, tea, pumpkin spice anything. Would look really cute in a gift basket with a coffee mug, cinnamon, and muffins. Another option would be to fill the pumpkins with some cinnamon or use cinnamon sticks for stems.
Ann Butler Products used:
ColorBox Crafter’s Ink – Tangelo
Ann Butler Faux Quilting Rubber Stamps – Unity Stamp Company 2″
Other Products:
- Muslin
- Poly-Fil
- Glue Gun
- Scissors
- Sewing Machine – Thread
- Iron
- Green Burlap
- Sticks/branches
- Pumpkin face buttons by Flair
I hope you enjoyed this Stuffed project as much as I did!
Until next time, Craft on……..
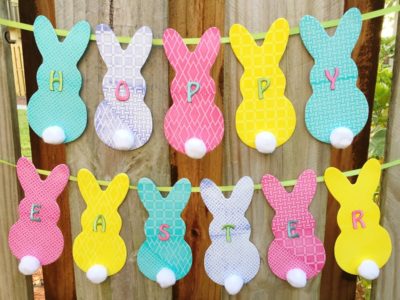
Create a Faux Quilted Stamped Bunny Banner in 30 minutes
Good Morning! Beth here on the blog today with a quick and easy Faux Quilted Stamped Bunny Banner that goes together in just 30 minutes!
STEP ONE:
Stamp a variety of Background Basics Stamps on Bunny shapes with Berry, Aquamarine, Lilac and Sunshine inks, let dry. These large, 3″ square red rubber stamps are easy to line up to create the faux quilted effect on the Bunny shapes. Crafter’s Inks can be used on almost any surface, but are designed to work best on non-traditional surfaces like clay, metal, plastic and fabric.
Here is a close-up detail of the stamping.
STEP TWO:
Attach a white pom pom to the base of each Bunny shape with MONO Multi Liquid Glue.
STEP THREE:
Layout the Bunny shapes, then add HOPPY EASTER with Joy Embroidered letters in Green, Pink, and Blue. Since these letters cannot be ironed on to craft foam, attach with glue.
STEP FOUR:
Attach Bunnies to ribbon with glue.
It’s as easy as that! A few supplies and 30 minutes is all it takes to create a super cute Faux Quilted Stamped Bunny Banner just in time for Easter!
This post may contain affiliate links when you make a purchase, we earn a commission at no extra cost to you – this helps to keep this website up and to continue to bring you awesome projects like this one!
Ann Butler Design Products used:
ColorBox Crafter’s® inks by Ann Butler: Berry, Lilac, Sunshine, Aquamarine
ColorBox® Background Basics by Ann Butler: Picnic, Diamonds, Basket, Checks
Other Products:
- Tombow MONO Multi Liquid Glue
- Joy SA Embroidered Letters: Pink, Green, Blue
- Bunny Shapes, pre-cut from craft foam (11)
- Pom Poms, white, 1″ (11)
- Ribbon, Green, two 36″ lengths
Follow Ann Butler Designs on Facebook and Instagram for tons more stamped, inked and stenciled inspiration!
Thanks for stopping by!
Creatively, Beth
Valentine’s Day Hugs and Kisses Kitchen Towels
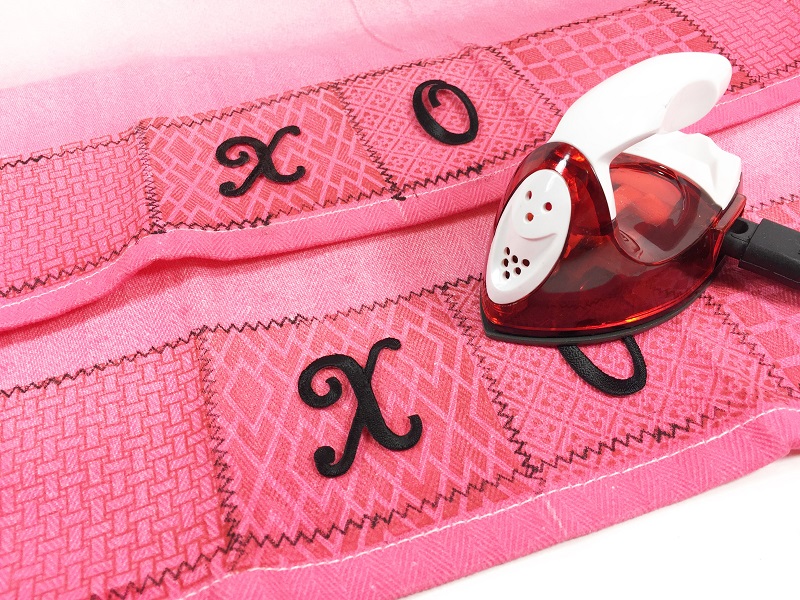
Good Morning crafty friends! I love sending close friends and family personalized gifts every holiday. Hugs and Kisses Faux Quilted kitchen towels featuring Ann Butler Designs stamps and inks will show everyone just how much they mean to you this Valentine’s Day!
Here’s how to make these Valentine’s Day Hugs and Kisses Kitchen Towels:
Step 1:
Stamp a variety of Background Basics Stamps on kitchen towel with Berry and Canyon inks, let dry. These large, 3″ square red rubber stamps are easy to line up to create the faux quilted band at the edge of the ombre kitchen towel. Crafter’s Inks can be used on almost any surface, but are designed to work best on non-traditional surfaces like clay, metal, plastic and fabric.
Step 2:
Accent with the zig zag Stitch Stamps and Crafter’s Ink in Night. Stamp the stitches in a random and overlapping fashion to achieve a hand sewn effect.
Step 3:
Apply the Joy iron-on, embroidered letters according to package directions with either a small craft iron or regular iron. Use XO and XO for Hugs and Kisses or create a custom saying such as LOVE, KISS or BE MINE.
It’s as easy as that! A few supplies and 15 minutes is all it takes to create super cute Valentine’s Day Hugs and Kisses Kitchen Towels just in time to give (or keep) for Valentine’s Day!
This post may contain affiliate links, when you make a purchase, we earn a commission at no extra cost to you – this helps to keep this website up and to continue to bring you awesome projects like this one!
Ann Butler Design Products used:
ColorBox Crafter’s® inks by Ann Butler: Canyon, Berry, Night
ColorBox® Background Basics by Ann Butler: Picnic, Diamonds, Weave, Checks and Stitch Stamps
Other Products:
- Joy® iron-on, embroidered letters – 2″ Black Script – two X’s and two O’s
- Ombre Kitchen Towels (scored at the Target Dollar Spot)
- Craft Iron (or you can use a regular iron)
Follow Ann Butler Designs on Facebook and Instagram for tons more stamped, inked and stenciled inspiration!
Thanks for stopping by!
Creatively, Beth
Quick and Easy Stamped Valentine Message Blocks
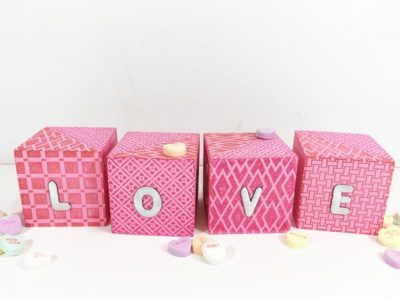
Valentines Day is just around the corner and what better way to get your message across to the ones you love than these cute Stamped Valentine Message Blocks that showcase a different word on each side! Quick and easy to make in under 30 minutes!
Please note: This post contains affiliate links. If you use these links and make a purchase, we earn a commission at no extra cost to you…
Step One:
Paint wooden blocks with Americana® paint by DecoArt in Bubblegum Pink, let dry. Apply a second coat, if necessary.
Step Two:
Load ColorBox® Background Basics stamps by Ann Butler with ColorBox Crafter’s® inks by Ann Butler in Canyon and Berry. Stamp randomly on each side of the wooden blocks.
Step Three:
Select a variety of Joy® Iron-on, embroidered letters and spell out your favorite Valentine themed words. I chose LOVE, KISS, SEXY and HUGS.
Step Four:
Apply Joy® Iron-on, embroidered letters according to package directions. I use a small craft iron for the best control, but any iron will work.
I hope that you have enjoyed my Quick and Easy Stamped Valentine Message Blocks and that you will use this project as a jumping off point to showcase YOUR creativity!
Check out this other quick and easy Valentine’s Day project: Quick and Easy Napkin Rings!
Ugly Sweater Christmas Cards
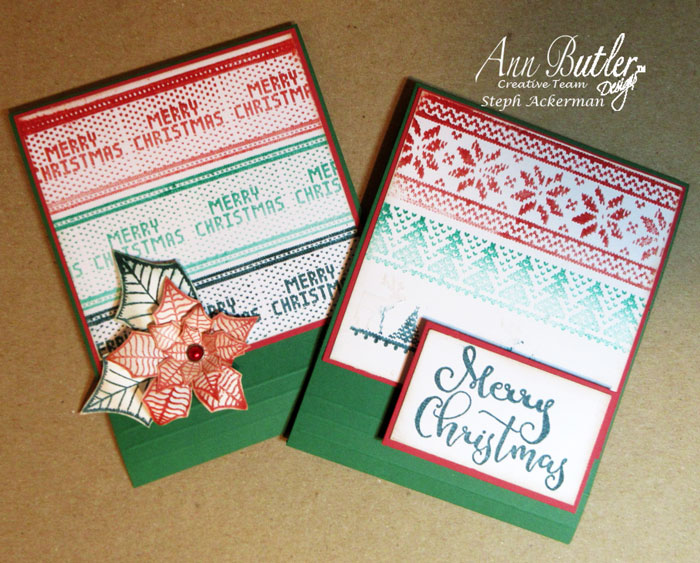
Hi everyone Steph Ackerman here today with two Ugly Sweater Christmas Cards. Christmas will be here before we know it so, it’s time to finish those cards!
Step 1:
Using one of background stamps, I stamped it on a 4″ square panel using Canyon, Evergreen and Deep Woods Inks.
Step 2:
Using 3 background stamps, I stamped them on a 4″ square panel using Canyon, Evergreen and Deep Woods Inks.
Step 3:
The panels were inked with Desert Sand.
Step 4:
The multi background panel was matted on red cardstock, then added to a green card. Merry Christmas was stamped in Deep Woods Ink, edged with Desert Sand and matted with red cardstock. Three lines were scored along the bottom of the card and Merry Christmas was added with foam adhesives.
Step 5:
The Christmas panel was matted on red cardstock, then added to a green card. A poinsettia was stamped in Canyon Ink and the leaves in Deep Woods Ink, then fussy cut. Three lines were scored along the bottom of the card and the fussy cut poinsettia was added with a brad.
Aren’t these Ugly Sweater Christmas Cards fun? So, have you finished your Christmas cards yet?
This post may contain affiliate links, when you make a purchase, we earn a commission at no extra cost to you – this helps to keep this web site up and to continue to bring you awesome projects like this one!
Ann Butler Design’s Products used:
Ann Butler Crafter’s Ink by Clearsnap: Desert Sand, Canyon, Evergreen, Deep Woods
Other Products:
- Cardstock: White
- Stamps: Joy Clair Stamps
- Foam Adhesives
- Scor-Pal
Follow Ann on Social Media:
Thanks for stopping by.
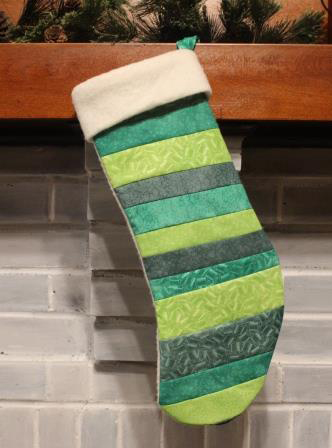
Crafter’s Ink Quilted Christmas Stocking
Did you know that you can color fabric with Crafter’s Inks? I’m going to show you how easy it is and then share how to create this quick Crafter’s Ink Quilted Christmas Stocking.
Step 1:
Ink up a color blender with Limelight Crafter’s Ink and apply to fabric.
Blend until you have the color desired. Continue with assorted tone-on-tone fabrics with Evergreen and Deep Woods.
Step 2:
Heat set.
Step 3:
Tear colored fabric into strips in assorted sizes between 1″ – 2″ and then, cut 2 stockings from Toasty Cotton batting from Fairfield.
Step 4:
Place 2 strips onto one of the stockings right sides together, stitch onto the stocking and then open.
Step 5:
Continue to sew strips to the stocking until it is covered. Turn the stocking over and trim excess fabric from around the edges.
Step 6:
Place the second stocking onto the quilted stocking and stitch around the edges.
Step 7:
Stitch the small piece of fabric, right sides together along the long side, turn to the right side and fold in half for the hanger. Set aside. Stitch the short sides of rectangular batting piece together, Fold in half, wrong sides together and place on the top of the inside of the stocking, placing the hanger on one edge. Stitch in place.
Turn to the outside of the stocking.
Hang and enjoy your Crafter’s Ink Quilted Christmas Stocking!
This post may contain affiliate links, when you make a purchase, we earn a commission at no extra cost to you – this helps to keep this website up and to continue to bring you awesome projects like this one!
Ann Butler Design Products used:
Ann Butler Crafter’s Ink by Clearsnap: Evergreen, Limelight, Deep Woods
Partner Products:
- Fairfield™ Toasty Cotton batting, 12″ x 18″ (2), 15″ x 6″ (1)
- Colorbox Color Blenders, (3)
- Oliso Iron
Other Products:
- Tone-on-Tone fabrics, assorted scraps
- Sewing Machine
- Thread, cream
- Scissors
- 1
- 2
- 3
- …
- 8
- Next Page »