Your cart is currently empty!

Bookmarks with Background Basics
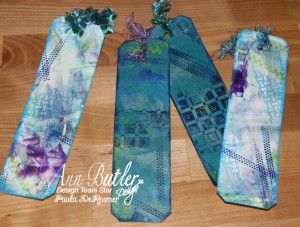
Hi crafters, Paula here today with some Bookmarks using Background Basics, Ann Butler Designs Iridescents, and Colorbox Crafter’s Inks by Ann Butler Designs. So, you’ve probably seen the technique using shaving cream to make backgrounds. Well, today, I’m using Cool Whip. Yes, yes, you read that right. Cool Whip. Keep reading to see more.
 Supplies:
Colorbox Background Basics by Ann Butler Designs in Baskets 1, Checks 1, and Stitch Stamps
Ann Butler Designs Iridescents in Amethyst, Sapphire, and Limelight
Colorbox Crafter’s by Ann Butler Designs in Ocean Breeze, Blueberry and Limelight
Cardstock
Yarn/string for toppers
Corner/angle punch and hole punch
Cool Whip
Spatula
Here’s what I did:
A fun way to make some abstract designs on cardstock is a popular technique using shaving cream. I had read that groups with children used Cool Whip instead. I wanted to give it a whirl. So much fun! The only fallback is that it was a little sticky. I started by putting a couple spoons of the whipped topping directly on my cardstock. Then I took a toothpick and grabbed some Iridescents in three different colors (Amethyst, Sapphire, Limelight) and dropped randomly. Taking a clean toothpick, I did a swirl to mix. I next took my spatula and spread the mixture on the cardstock, then scraping it completely off. It will leave the remains of the colors into almost a marble effect. I had enough mixture left over that I scooped it onto two other sheets of cardstock and did the same thing. Each one had a totally different look.

The next step is to just let the cardstock dry. This is a good project to start one day, let it sit and finish the next to make sure it’s completely dry. I did take a heat gun to it prior to letting it sit.

After the sheets are dry, I cut them into strips, approximately 2″ x 7″. Then using the Background Basics stamps, and Crafter’s Inks, I randomly stamped the images. I then used the ink pads to border the bookmarks.
Once stamping is complete, hit the bookmarks with a heat gun.
Punch holes in the top of the bookmarks. Then using a corner punch, trim the edges of each. Add the yarn/fibers in the holes.
Th. at’s it! Hope you enjoyed this simple, yet fun project. Is a great way to just “play” and a great project for kids. I love the way the Iridescents just shimmer in the light!
Plus, I needed a new bookmark for this awesome book I’m reading.

Thanks for stopping by. Have a great day!

Leave a Reply