Your cart is currently empty!
Ann Butler Design’s Walnut Hollow Blog Hop
Welcome to the Ann Butler Designs and Walnut Hollow Blog Hop!

I am so delighted to be doing this blog hop with my Design Team and Walnut Hollows Team! Everyone was able to pick something from Walnut Hollow to decorate with the Ann Butler Design’s products from Unity Stamp Company, Clearsnap Inc and Earth Safe Finishes!

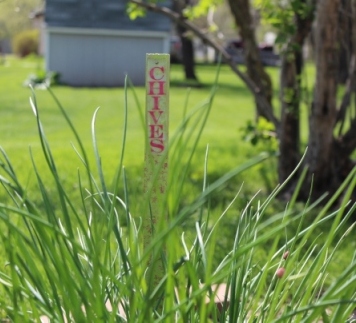
I chose to make some Garden Stakes for our Herbs, since it is not always easy for me to remember which is which.
Supplies:
- Ann Butler Designs Faux Quilting™ Stamps ; 2″ Leaves All Over from Unity Stamp Company
- Ann Butler Designs Iridescents™; Limelight from Earth Safe Finishes
- Ann Butler’s Crafter’s Ink; Berry from Clearsnap Inc.
- Ann Butler Designs EZ-De’s™ Flourish 2″ Alphabets
- 21″ Wood Stakes; Item Number: 40458-501by Walnut Hollow
- Shrink Film; Clear by Grafix®
- Chalk It Up by Earth Safe Finishes: Plum Preserves, Whipped Cream, English Tea Cake, Licorice
- Small Nail
Tools:
- Westcott Cutting Mat
- Westcott Non Stick Scissors
- Acrylic Block
- Paint Brush
- Heat Gun
- 5/8″ Hole Punch
- Tweezers
- Hammer

To get a deep rich color from the Iridecents™ Paint try base coating several of the stakes with different colors of Chalk It Up, you will be surprised at the different results you can get….from left to right: Plum Preserves, Whipped Cream, English Tea Cake, Licorice and then I let them dry.

I applied the Iridescent’s in Limelight to each stake to determine the color combination I wanted to go with….you can see the beautiful iridescent color on each of these stakes, all just a bit different in color because of the Chalk It Up base coat. You can also use the Iridescent’s™ Paint directly to the wood if desired.

Next I cut a piece of the Shrink Film 2″ wide by 11″ long and stamped out the word chives.

Punch a hole just above the first letter and trim off excess if needed. Hold the Shrink Film in place with the tweezers and begin to shrink it with the heat gun, following the directions on the package.

Continue shrinking until done and place an object on it if needed to help flatten the Shrink Film. Let cool and remove the object.

Stamp stakes with 2″ leaves stamp from the Leaves all Over stamp set, heat set to dry.
Add the nail near the top of the stake and place the “Chives” Shrink Film onto the stake…..

Make these fun stakes for each herb in your garden and you will always know what you have! Enjoy!!
Now for the Giveaway…..

Leave a comment below and on each of the blogs with this photo for a chance to enter the drawing for this Giveaway of Ann Butler Designs products! You will receive one entry for each comment you leave. Winner will be drawn on May 30, 2014 and notified on or before June 1, 2014.
Now be sure to check out all of the links below to see other fabulous projects!
Ann Butler (you are here)
Comments
47 responses to “Ann Butler Design’s Walnut Hollow Blog Hop”
This such an awesome idea and a great project…….love it.
Wonderful project.
What a great idea. Very cute.
Thanks Larissa!
Awesome! Love it!
What a lovely idea for the garden!
Thanks Mary!
What a fantastic idea for your garden! Loving the shrink wrap!
Happy Memorial Day weekend, giving thanks to those who fought and died for us.gLAD YOU LIKE THEM!
Great project, thanks for sharing
Like the idea of using the shrink film instead of painting directly on the stake.
Thank you Fran it gave it another dimension and I was able to use the EZ-De’s Alphabet Stamps!
Ann, love this idea! I will be working in my garden this weekend – may have to create some of these to add!
Love the idea of the fancy stakes for the garden. My granddaughter has an herb garden and I think I’ll make some of these stakes for her. She only has a few plants in some pots but it would jazz them up. thanks for the idea.
Thank you Marylou, these were quick and easy to make and will make a great gift for your granddaughter!
Great techniques
Thank you Jennifer!
Cute idea! I also would have trouble remembering what’s what in my garden!
Thanks Sylavana….it does help to identify the herbs!
Love these.
Thanks Carmen!
Wow Ann! Love your idea using the shrink film and the Iridescents look beautiful. Thanks for showing its effect on different paints.
Thank you so much Roberta! Another quick and easy project that is functional always a plus!
Fantastic blog hop! Love all of the projects each lady created!
Thank you Jennifer I think they all did a fantastic job also!
Wow! Such a great idea! And these printed stakes would make such a lovely gift in a bunch and tied to together with a ribbon!
Great idea Carmen!
I am so pleased to start seeing earth safe art supplies being offered. I love the rich colors that you have used on your plant stakes. I may just have to make some for my potted plants.
Thank you Viki….I love Earth Safe Finishes also and the Iridescents are beautiful!
After having spent the day gardening, this project really inspired me. I can hardly wait to try it myself. Thank you for sharing your work.
Thank you Patti!
cute stakes!
Thanks Lisa! They were quick and easy to make, something I love to do!
Great idea. thanks for sharing. Would love to win.
Thanks Karen….I got you entered!
Ann, thought I left a comment early this morning, but I don’t see it! I love these stakes! Great idea!
Thanks Paula!
This is a great idea. I need to make some for my son who is now just putting his garden in.
Thank you Peg they are so quick and easy to make and really help in the garden!
This is a great idea! I haven’t used shrink film in a long time.
Thank you glad you like it….shrink film is so easy to use!
Great idea Ann. Love the shrink film!
That is such a neat idea, It makes me want to re-do my herb garden!!!! I might have to get on that!
Thank Heather! They were fun and easy to make!
Great idea, I should make some too since I sometimes don’t know the difference between plants and weeds!
What a spectacular idea!!!! LOVE it so much. I wish I had seen this when I planted all my flowers. I have no idea what is growing where at the moment. lol I will definitely be doing this for the garden going in next week. Thanks so much and I love, love, love those colors in your give-a-way!!!! 🙂
what a fun and creative way to add to a garden!
Leave a Reply